Sunday, May 31, 2015

Antique Pine and the work was worth it.

Finally, got the finish finished on the antique pine special sized shave brush. 
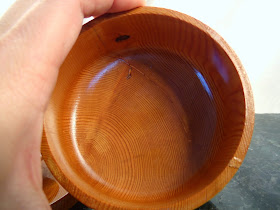
You can see the branch terminal bud and the other black come from a nail that was nailed into the tree an age before it was felled.  Thanks goodness, Eric found the nail before it went flying through the air or it ruined a tool.  The tree had completely grown around it and it was not moved in the raising of the barn, cutting of the tree, or disassembling the beam.

 
This is a regular knot size compared to the 32mm x 65mm silvertip knots.  while it looks petite in the picture the smaller one is the "regular size".

 
Here is the large brush and bowl next to a regular size bowl.  The owner is a tall man (6'4) and wanted finally to be able to feel a brush in his hand correctly for someone who is taller.  We happily custom make brushes and bowls for individuals.  Please do not to hesitate to let us make your dream brush.
 

Thursday, May 14, 2015

Antique Pine Challenges and Triumphs

We have been working on the antique pine brush a bowl.  Awesome and frustrating experience.

First did not expect the movement of the wood when cutting.  Since barn beams are green (very wet) at a bran raising, 2000 years later, they expect to be in the same position.  Once they are freed, they move quite a lot.  lol.  then they can split and check at random.

Second, the pine is now so very dry that the varnish gets sucked into the wood.  Much more then in any other type of wood we have worked with.  This makes building a finish takes several coats.  Actually it felt like several million coats to build a nice finish.


In the picture above, you can see the bumpy grain.  This should be flat.  normally, varnish slides over the surface and even things out.  The piece of wood is so dry it drinks in the varnish.  Then we have to sand and even out for the next coat.  In this picture, there are 4 coats of varnish already applied (sanded and re-applied, repeat)


You can see on the inside of the bowl, the same thing happens.  But it is important to remember in order to judge the level of the finish, you have to look at it in indirect light.  There must be shadows so that you can discern the high and low points.
 
You can see in this photo how the light can change what you are seeing.  It was taken literally 2 minutes after the example from above.  If you don't pay close attention, you could get an awful finish.
 
but all good things take time and effort.  So, in the next 2 coats we will finally have a proper finish.